Today we will briefly look at the basic techniques for working with warm embossing. In case you are just learning how to make cards and the concept of “warm embossing” does not mean anything to you – this is a technique that uses special powder, when melted, beautiful relief images are obtained.
 Most often, hot embossing is done with stamps – no matter if they are rubber, silicone, foam, kling stamps, etc. But, if the type of stamps is irrelevant, the ink used for printing them is important for embossing. It should be either a special embossing ink or a water-based ink with slow drying (such are Tim Holtz’s distress inks and pigment inks). Of course, it is preferable to use the special ink for warm embos, because its highly sticky surface manages to permanently fix not only fine powders, but also emoting powders with larger particles, such as enamel powders. The wet imprints of slow-drying pigment inks can also adhere to embossing powders, but they cannot firmly hold larger particles and are not suitable for embossing techniques such as embedding. And if after this long digression you have forgotten what we were talking about 🙂 – the topic was warm embossing. The embossing ink image of the print is printed on paper or cardboard, after which the special embossing powder is sprinkled on it. This is a powder with finely ground particles, which, when heated with a special device called an embossing gun, melts, leaving raised and voluminous reflections or inscriptions. According to some, the hot embossing device can be replaced by blowing with a hairdryer or by placing the paper with the “powdered” image on a hot iron or in an oven, but with these methods there is a risk of blowing out the dust particles with the strong frost of the hair dryer, of changing the color of the paper when heated with an iron or of burning the powder, if left a little longer than a few seconds in the oven. In fact, it really takes a few seconds for the powder to melt – as soon as the specks of dust begin to change color, the powder has melted. In addition to the classic method of warm embossing with stamps, there is also a spectacular way to obtain a beautiful embossing reflection when working with markers containing embossing ink. Usually, these markers have two types of tips, thanks to which they can leave both thin and fine and denser marks, which makes them ideal for inscriptions and wishes. Maybe a little higher up was the place to mention that embossing powders are of two types – colored and transparent. Their coloring is
 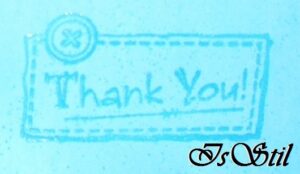 essential for the following techniques. The “watermark” technique is obtained by printing an embos image with transparent powder and transparent embos ink. In this way, the studied reflection is slightly darker in color than that of the surface being worked on. For me personally, this is one of the easiest and most economical techniques, Because I don’t have to match the different colors of powders and inks with the papers I apply them to – i.e. – transparent powders and embossing inks are universal and suitable for use on any surface, while colored ones require the use of specific color schemes. And that’s not all – individually each of the colorless embos products can be combined with the opposite color effect, which is why colorless products are the best possible combination for beginners. However, before we move on to color combinations, I will briefly mention another spectacular technique with transparent powder and ink, namely the “resist” technique that creates endless possibilities for unique cards. In it, colored distress inks or perfect pearls mixed with water are applied to the printed and embossed images.
Since the surface of the paper has changed since the melting of the powder, the dyes applied subsequently are not able to penetrate it and change its coloring, whereby the initially applied embossing motifs stand out with their paler colors on the handmade color background. Naturally, in addition to combinations of transparent inks and powders, there are also those in which one of the products is colored. Such a combination is the mixing of colorless powder for warm embossing with colored pigment ink. This type of ink is water-based and dries slowly, which is why fine powders can stick to them, but not powders with larger and heavier particles. When this type of embossing is used, the color image looks like it is covered with a glossy embossed outline.
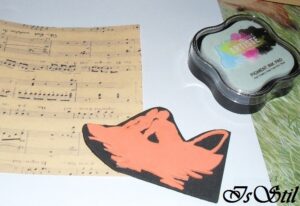
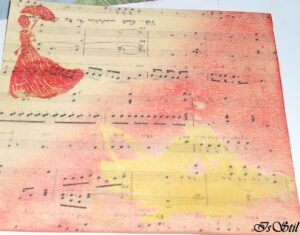
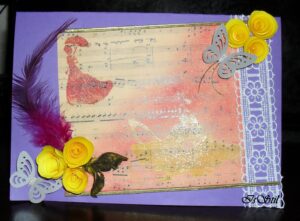
 Transparent embossing ink, in turn, can be combined with any type of color powders – both fine powders and coarse powders such as enamels. While the former achieve more detailed images, the latter are suitable for background images and for embedding various small elements, such as pearls, sequins, glitters, etc. The “embedding” technique is not at all as complicated as it seems – it is enough just to put the tiny particles on the sprinkled but unmelted powder, which need to be fixed and then the powder to heat up – when melted, it will adhere the elements to the paper. And, since several types of embossing powders were mentioned in the topic – the main difference between them is their ability for detailed prints, or in other words – the size of the particles, since the larger powders sometimes flow down during melting and go beyond the outlines of the seals. Some of these powders have glitter (sabi-chic powders), while others are designed to make spectacular coatings resembling the structure of glass (enamel powders). The glass effect of the enamels stands out especially well if 2-3 layers of the powder are applied on top of each other, which is why it can be used to make jewelry. In fact, no matter what project you start with a warm embossing – a card, an invitation, a box or a piece of jewelry, I’m sure you’ll be extremely pleased with the results. And I will be happy to share them as comments under the article 🙂 And finally, a few photos from making a warm embossing card with colorless embossing ink and two stamps. One print is in the style of a watermark, with a background of colored ink on it to highlight its “resistance” to subsequent smearing, and the other print is in red ink, sprinkled on top with transparent powder for warm embossing.